Basic Recipes > Chilli with Beans 4 April 2008
Posted by cath in mildly spicy, Recipes, variations, vegetables, very spicy.add a comment
My recipe for chilli is slightly inspired by Thai cuisine as I used to eat these very hot chilli con carnes out in Thailand. The recipe is quite spicy, with lots of fresh chillies, coriander and lime. Its nickname is “Tom Yum” Chilli because my Thai friend thought that it tasted like the hot and spicy Thai soup. Of course you should adjust the amount of chilli to your tastes.
This recipe below is actually a fantastic vegetarian chilli san carne, or you could try a variation with meat if you prefer.
Add guacamole and salsa, some tortilla wraps or chips to accompany the dish. You can use the basic stew recipe to make a variety of different Mexican inspired dishes…like this toasted chilli wrap.

Toasted Tortilla with Chilli, Sour cream, Salsa and Guacamole
Ingredients
1 tin Aduki beans, rinsed and drained then slightly crushed
1 tin Black-eyed beans, rinsed and drained then slightly crushed
1 tin Kidney beans, rinsed and drained
1 small handful of each red split lentils and puy lentils – rinsed (uncooked)
1 large onion – chopped
1 leek – sliced finely
2-3 sticks celery – finely chopped or grated
1/2 golden beetroot – grated (If you want to use purple beetroot, use sparingly as they will bleed purple into everything!)
1 small carrot – grated
6-8 cloves garlic – crushed and finely chopped
1 large handful of coriander (leaf, stalk & roots, if available)
4 large red or green chillies – finely chopped (or to taste, remove the seeds for less heat)
1 large red chilli sliced for garnish
1 Bay leaf
1-2 heaped tsp cumin powder (to taste)
1 tsp sweet paprika
1 pinch smoked paprika
1-2 tsp chilli powder (cayenne pepper)
2 tbsp dried oregano (use fresh instead or as well if you can get it)
salt and pepper
1 large glass red wine (or a small glass of port)
2 tins tomatoes (or use fresh chopped tomatoes)
A selection of vegetables like mushrooms, peppers, spinach – diced/chopped as appropriate
Juice of 1 lime
Method
- Heat a large pan, add a few tablespoons of oil (like Oleifera), you may need more as you cook all the vegetables.
- Fry the onion on low-medium heat, stirring occasionally. Just start to soften the onion, not brown it (about 5 minutes).
- Add the celery, leek and again fry off gently until they begin to soften (about 3 minutes), stirring gently.
- Then add the grated carrot and beetroot, fry, stirring gently – add a spoon more oil as required but don’t make it too greasy.
- Add the garlic, and taking the stalks and root from the coriander (save the leaf for later), chop finely and add to the pan. Stir again.
- [If you are using mince pork or beef, add it here and brown gently, stirring.]
- Now add the spices to the pan, the bay leaf and the dried oregano, a sprinkle of salt and pepper. Mix well and let fry gently for a minute.
- Get the crushed aduki and black eye beans, and the lentils and stir them into the pan with the spiced ingredients. Mix everything well.
- Add the wine, stir and let the alcohol evaporate.
- Add the tomatoes, break up the tinned tomatoes with the spoon. Stir well to combine. Add a large glass of water, and keep some at the side to add as required to loosen the mixture.
- Bring to a gentle simmer.
- Add the chopped mushrooms and fresh oregano if you have it.
- Simmer the dish with the lid partially on for 45-50 minutes, stirring occasionally, adding extra cold water if required (particularly if you are cooking lentils).
- With 10-15 minutes to go before you serve, add the peppers, check the seasoning and add more fresh chilli if required to taste.
- Add the drained kidney beans to heat through.
- With 5 minutes to go, stir in the spinach to wilt.
- Then remove from the heat, finish off with chopped coriander leaf and lime juice.
Serve with rice and sour cream.
Tips and Variations
Chilli is lovely with just mixed beans and vegetables as in the ingredients shown here, but you could also make it with pork or beef mince. Just substitute the meat for some or all of the beans and lentils. Add meat at the frying stage.
You can make chilli in advance as well. Remember that any beans in the dish will have continued absorbing liquid and flavour, which means you will need loosen the sauce with some extra cold water as you reheat it.
You can use any type of bean, or a mixture of different beans and lentils as I’ve used here. To save time, I usually use tins of pre-cooked beans, which will disintegrate more into the dish, but I also add some uncooked lentils to balance the different textures. Simmering the tinned beans gently in the sauce allows them to soak up the flavours. If you have time you could use dried beans and make everything from scratch – that way they will absorb even more flavour.
You can add any root vegetables you like – just grate and sweat them off in the base – they stew and melt into the sauce adding lots of flavour.
Chunks of mushrooms and peppers make a good addition to the dish, although you could use other vegetables – just put them in the sauce at the appropriate time to cook them through.
If you have any, you can also add some chopped fresh tomatoes at for a minute or two at the end of cooking for a fresher flavour (in season). Or try a tin of Mexican green tomatillos.
Seasonal Specials > Broad Beans 18 July 2007
Posted by cath in easy, specials, summer, variations, vegetables.1 comment so far

Broad beans are in season at the moment and taste fantastic fresh from the pod. The pods are larger than peas, but basically the same idea – unless they are very young (baby broad beans), you don’t eat the pod (but it does make a lovely stock for vegetarian food).
Broad beans go fantastically well with pancetta (plus this might help you get broad beans on the menu for those more fussy about their veg!).
Broad beans steam really well, taking about 5-6 minutes, but less if they are very small and young. Just remove them from the pods, rinse and steam. Serve with a knob of butter.
Here are two methods of cooking broad beans:
If you’ve got a few large handfuls of broad bean pods you can make a very quick and easy, vegetarian broad bean pod stock. Just cover the beans in water in a large pan, bring to the boil and simmer for 15 minutes. Strain out the pods and reduce the remaining stock. You can reduce it right down to a syrupy liquid and freeze in cubes (or small batches), or just reduce to taste. Stock with a good flavour and consistency will give you a base for making soup or risotto.

Broad bean pod stock (front) and
Pea pod stock (back) – reduced and frozen
You can mix pea and broad bean pods together, or do pea-pod stock in the same way. Don’t simmer for longer than 20 minutes – vegetables like these pods release their flavours quickly and can get bitter if overcooked.
Vegetables > Broad Beans cooked in Tomato Sauce 18 July 2007
Posted by cath in easy, summer, vegetables.add a comment
Using some freshly podded broad beans, and some homemade tomato sauce you can make a vegetarian version of my broad beans with pancetta, tomato and pasta. It’s just as nice, and healthier without the pancetta and pancetta oil.
You just need to cook the broad beans gently in the tomato sauce for the last 6-8 minutes of cooking, so once the pasta cooking you can put them in. Thats it! Check the beans are done, then add to the tomato sauce and serve. Couldn’t be easier!
Mix some fresh basil or other herbs into the sauce to vary it. Sprinkle with cheese for a richer dish.
The finished dish:
Vegetarian Broad Bean and Tomato Sauce with Spaghetti
Vegetables > Broad Beans with Pancetta 18 July 2007
Posted by cath in easy, summer, variations, vegetables.add a comment
For this recipe, take a large handful or two of broad beans, remove them from the pods.
Take about 2 inches of pancetta and cut it into slices (which look like Frazzles, those bacon crisps!) and then each slice into short sticks.
Find a frying pan which is the right size to fit a lid onto it. Heat the pan up, dry (or use with just a very small splash of oil, rubbed over the pan with some paper towel so that there is the barest coating. This can help the pancetta start to cook and not burn).
Now, fry the pancetta on a low heat, melting the fat and gradually crisping up the pancetta pieces. Be careful to agitate them and not to let them burn.
Once they are crisp, you may decide you have too much oil in the pan, if so remove some until you have enough to just cover the base of the frying pan. (You can use this oil to fry other things like mushrooms or onions, so keep it covered in the fridge.)
Now with the heat turned slightly higher, throw in the broad beans and mix them with the oil. When they start to sizzle, throw in a splash of water (it may spit a bit so be careful!) and quickly cover with the pan lid, after a minute or two, turn the heat down again. Shake the pan a few times during cooking, they will take about 5-10 minutes, depending on their size. Test one to check it is done. It should be soft (but not mushy!).
Remove from the heat and drain on a paper towel.
This makes a great simple side dish for a meal, or throw the cooked beans with some hot tomato sauce and stir it all into some cooked pasta – yum!

Broad beans, pancetta, tomato and pasta
Vegetables > Spiced Red Cabbage 17 January 2007
Posted by cath in easy, mildly spicy, Recipes, variations, vegetables.1 comment so far

Spiced Red Cabbage with Roast Pork, Parsnip, Mash, Apple Sauce
Cabbage is easy to get hold of this time of year. This is a nice way to cook red cabbage. The cooking method can be used with various herbs, spices and flavours in the cooking liquid. It can also be adapted for other cabbages, with different amounts of liquid and length of cooking time.
This recipe is for red cabbage with ginger, apple and nutmeg in a port and wine vinegar sweet and sour glaze. It’s all in one pot, and takes up to an hour to cook slowly followed by a quick simmer to reduce any excess liquid to a syrupy sauce.
This makes a large quantity (using up a whole cabbage) – but it keeps well in the fridge for 5 days. Reheat batches in the microwave for about 5 minutes or in a small pan on a low-medium heat for 5-10 minutes.
Ingredients:
1 red cabbage – shredded (less than 1cm thick strips)
1 red onion – thinly sliced
1 bramley apple or 2 tart smaller cooking apples – cored and sliced finely (no need to peel)
2 inches grated fresh ginger
1/4 of a grated nutmeg (don’t use the pre-grated stuff, it doesn’t provide enough flavour – buy whole nutmegs)
Salt and pepper
Butter and olive oil.
For the cooking liquor:
2 tbsp port
2 tbsp wine vinegar
1 cube frozen home-made chicken stock (or equivalent)
2 tbsp dark brown or muscovado sugar
4-8 tbsp water (as required)
Method:
Heat some butter and oil (roughly equal proportions) in a very large pan (large enough to fit all the shredded cabbage and other ingredients!) – use just enough so that it covers the bottom of the pan well.
Cook the onions on a low-medium heat until they are translucent but not browned, then add the apple and cook for a few minutes, stirring around.
Add the ginger, nutmeg. Stir through and cook for a minute more.
Rinse the red cabbage in a colander so that it is damp, add half of it straight to the hot pan and stir well. Then add the rest of the cabbage.
Add the cooking liquids.
Don’t worry that the liquid doesn’t cover the cabbage, it only has to provide steam for the cooking process. Any extra liquid you add will have to be reduced at the end of the cooking time, so keep it to a minimum. When you stir the dish occasionally during the cooking time you can add a splash or two of water if the pan is drying up.
Season well with pepper and a touch of salt.
Cover and simmer on a medium heat for 10 minutes until the cabbage had wilted. Then stir well to combine.
Turn down the heat and simmer gently for 30-50 minutes (depending how well done you want the cabbage and how thick you cut it), stirring occasionally.
Finally, when the cabbage is cooked remove the lid and turn the heat up to reduce any left over cooking liquor, stirring to coat the cooked cabbage in the thickened glaze.

Spiced Red Cabbage
Enjoy cookalicious cabbage! Great with sausages, roast pork, spicy chicken drumsticks…all kinds of things.
Variations:
Try using cinnamon, cloves, even dried chillies to make a fiery, extra spicy cabbage dish. You can use garlic, leeks or more onions instead of ginger too.
You can use almost any liquid. If you don’t want a sweet and sour effect using vinegar and sugar, just use more stock, water or wine instead.
For a savoy cabbage dish which is great with sausage and mash, try this which uses the basic method above with reduced cooking time and different flavours:
1 savoy cabbage – shredded (as above)
1 onion – finely sliced
1 stalk of celery – finely sliced
3-5 cloves garlic – finely chopped
1 glass white wine
Oil, butter, salt and pepper
Cook the onion slowly in oil and butter, then add celery and finally the garlic – do not brown, cook until soft. Add the cabbage, season with salt and pepper and pour in the wine. Cover and cook on medium heat for 5-10 minutes until wilting nicely. Then reduce the heat and cook for up to 20 minutes until the cabbage is soft but not mushy. You may have to remove the lid to reduce any excess liquid in the pan for the last 5-10 minutes.

Garlic Braised Savoy Cabbage
Stir Fry > Spicy Sweet and Sour Pork with Vegetables 29 November 2006
Posted by cath in mildly spicy, Recipes, stir-fry, variations, vegetables.2 comments

Spicy Sweet and Sour Pork with Vegetables
This isn’t the battered pork balls that you may think of when you think of sweet and sour pork – instead, this is a Thai/Chinese fusion of healthy, local, in season vegetables, with lean pork, stir fried in a spicy sweet and sour sauce.
I like to try and encourage home cooking, and all in one dishes are a popular choice. The stir fry, although Asian in influence is made with mostly local produce – carrots, courgette, Savoy cabbage, sprouting broccoli, onions, garlic, mixed mushrooms, tomatoes and fresh coriander. The only imported ingredients are my chillies and ginger – not bad.
Any lean pork will do, here I’ve used tenderloin – that’s like the fillet of beef in pork. The meat has a mini-marinade before cooking. This is often the case with Chinese recipes and can be done for as little as 5-10 minutes, or you could leave it longer but not overnight. I usually prepare the meat first then leave it to marinade for a bit whilst I chop the vegetables.
Preparation
The sauce is easy – I’ve used it before.
- 2 tbsp pineapple juice (from the tinned pineapple)
- Juice of a lime
- 1 tbsp soy sauce
- 1 tbsp fish sauce
- 1 tbsp oyster sauce
- 3 tbsp ketchup
- 1 tsp sugar
- a dash of tomato puree for colour.
Just mix it together in a bowl and set aside.

The ingredients
(Clockwise from Top-left: Sweet and Sour Sauce, Pineapple pieces, coriander, chili and tomatoes, chopped courgette and cabbage, carrot and broccoli, sliced onions, garlic and ginger. Bowl of mixed mushrooms in the centre.)
- Thinly slice the pork and combine it in a bowl with 1 tbsp dark or light soy sauce, 1 tbsp Shaoxing rice wine (or you can use white wine or dry sherry if you have it) and 1 tbsp sesame oil with 1 tbsp of cornflour.
- Chop the vegetables – carrots, courgette into thin sticks, cabbage thinly sliced, small sprouts of broccoli trimmed, slices of mushroom. You can chop more than you need for one night and keep half aside for an even quicker meal the next day. (If you have this dish with noodles rather than rice that also makes it quicker).
- Chop the base ingredients – thin slices of onion (red or white as you like), garlic and ginger.
- Chop a couple of tomatoes if you still have some from the “summer”, some chillies (2 large red chillies is a good heat) and some coriander stalk and leaf.
- Drain a tin of pineapple (natural juice or fresh if you can get it) and chop into bite-size pieces.
Cooking Instructions
When you’re ready to cook, start with the rice. The stir-fry will take only 5-10 minutes to complete, so when you’re ready to begin cooking, heat up the wok with a little oil (groundnut is good) in the base. Heat it up well, then add the sliced onion, followed by garlic and ginger. Stir fry for a few minutes but do not brown (particularly the garlic). You can add some chillies here if you want it hot and spicy.
Then add the marinaded pork and stir fry on a medium high heat for 2-3 minutes until nearly cooked. You can choose to remove the pork, onions etc. now if you like – to stop the meat drying out and to give you more room for the vegetables – remove and leave on a warm plate.
Now add the carrots, mushrooms, then broccoli, cabbage and finally the courgette (add them in the order of size and crunchiness – carrot usually takes the longest unless it’s been grated.) Use the remaining pineapple juice and water to loosen the stir fry rather than adding more oil.
Stir fry until all the vegetables are cooked. Then put the pork back in the wok with the sauce and stir through, heating the sauce. Finally, add the pineapple, tomatoes and decorative chili slices. Sprinkle fresh coriander on the top and serve with the rice.
Yum!
Basic Recipes > Roast Tomato Sauce 21 November 2006
Posted by cath in easy, freeze-friendly, vegetables.add a comment

Roasted Tomatoes
Adapted from a recipe by Hugh F-W, I’ve skipped some of the more fastidious bits – namely the sieving of the seeds and skin from the roasted tomatoes. Honestly – you can do it either way, but I hate waste and have never been bothered by the taste of the whole tomato. This recipe is so quick and simple, you should try it.
The sauce can be quickly made into a multitude of sauces – add lightly fried onions, wine and some stock and you have an instant rich tomato sauce for pasta, add extras like sliced chorizo, olives, extra garlic, a handful of mixed herbs, chillies, anything you like…
You can also add this sauce to many different dishes including meat bolognese, chilli-con-carne, soups. Finally, it makes a pretty good ketchup for burgers or bangers and mash.
I’ll often stick in a tray whenever I’m using the oven, and freeze or refrigerate the sauce for use in other dishes.
Preparation
- Pre-heat the oven to 180 degC.
- Cut the tomatoes into halves and fill up a baking tray (or two), placing them closely packed, cut side up, in one layer (don’t stack them).
- Sprinkle over some pepper, salt and a teaspoon or so of sugar (especially if you’re using late crop tomatoes – they will be less sweet naturally)
- Now roughly crush and chop a couple of cloves of garlic (to taste) and sprinkle them on top.
- Finally, drizzle some extra virgin olive oil carefully zig-zagging across the tops of the tomatoes…be careful not to pour on too much, just a fine trickle will do!
- Place in the oven for 45 minutes until browned then remove.
- Leave to rest for a couple of minutes then deglaze the pan – two options for this, either:
- Remove the tomatoes and deglaze with a glass of white or red wine, stock or water – boil up the liquid and scrape off all the caramelised residue in the tray then reduce down and add to the tomatoes – you can use a hand blender to very gently break up any large tomatoes or chunks of garlic (but don’t blend smooth as this will break the seeds and produce a bitter flavour).
or…
- For those who are even more pushed for time, you can actually deglaze the pan with the help of a glass of liquid (wine/stock/water) by just crushing up and heating the tomatoes in the pan all in one go – once the pan’s deglazed the tomato sauce should be thick and slightly caramel in colour.

Tray of Tomatoes – Ready to Roast

Roast Tomato Sauce
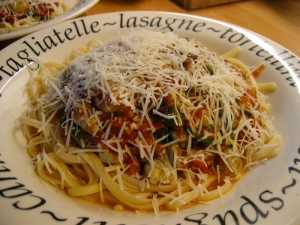
Tomato and Basil Sauce for Pasta 5 July 2006
Posted by cath in easy, freeze-friendly, Recipes, variations, vegetables.add a comment
Tomato Sauce, perhaps the most wonderful thing you can do in the kitchen! Tomatoes are in season right now, so go and buy some and try this!

Tomato and Sausage sauce with Pasta
garnished with Basil leaves and grated cheese
How to make a basic tomato sauce:
Step 1, buy some good quality tomatoes – preferably from a local source, not the supermarket – honestly they will taste much better. I recommend J & M Craig, Carluke, available from the Castle Terrace Farmers Market in Edinburgh.
Step 2, roughly chop the most ripe tomatoes, skin, seeds and all. For 2-3 people you’ll need about 500g – scale the recipe up or down as required, it keeps well in the fridge or freezer.
Step 3, roughly chop 1 large or 2 small onions and a few cloves of garlic.
Cooking:
- Heat some olive oil in a pan.
- Add the onions and sweat down on a medium heat until translucent.
- Then add the garlic and cook for about a minute.
- Now add the tomatoes, stir and cook for a minute or two until they start to soften.
- Once the tomatoes are hot, turn down the heat and half-cover the pan.
- With the heat on very low, stirring occasionally, cook for about an hour (minimum) until the sauce has thickened and sweetened. Turn off the heat.
- Now add salt and pepper to taste.
- Finally, throw in some chopped fresh herbs, basil or parsley are excellent.
- Serve with pasta and top with some grated cheese (Parmesan style)
Final adjustments:
If the sauce is too runny, try boiling it down without a lid until you get the desired consistency.
If the sauce is quite thick, add a few spoons of the water you use to cook the pasta in, again, keep going until you get the consistency you want.
Drizzle some extra virgin olive oil into the sauce at the end for a slightly richer flavour.
If you’re fussy about tomato skin and pips, you can use a sieve or press the finished sauce to remove them, but I think the chunky texture works well and saves loads of time!
Variations:
As well as the classic tomato and basil, you can combine many different things into this sauce. It also works as a base for bolognese, chilli con carne or anything that needs a bit of tomato sauce.
Add a bit of fried pancetta, cooked sausages, sliced chorizo or salami or anything meaty for a quick meaty pasta sauce (see picture above).
Add mushrooms (fried or cooked in the sauce), spinach, other vegetables, more herbs – rosemary, thyme, oregano, marjoram for veggie pasta sauces.
Add chillies – I hope soon to be adding my homegrown chillies to the sauce for a bit of a kick…, olives, capers, anchovies…the list is endless.
Try your favourite ingredients…use something different every time. Dinner never got so easy!
Tip!
Get some really good quality dry pasta – macaroni, penne, spaghetti, spaghettini, linguine, whatever you like. The best pasta is rough on the outside, rather than smooth (which is a quality of mass production).
Sandwiches 21 June 2006
Posted by cath in bread, ingredients, Recipes, vegetables.add a comment
Can a sandwich really be a recipe? well, who cares – having made some beautiful home-baked bread, what better way to enjoy it than to have some healthy sandwiches.

Here are my favourite fillings:
Pastrami, guacamole, salsa and Jarlseberg
Hard goats cheese (such as Brinkburn), tomato and rocket
Any cheese with tomato and basil
Cheese salad with beetroot
Roast beef (left over topside), horseradish, mayonaise, tomato and salad
Left over roast chicken, english or dijon mustard, mayonaise and salad
Left over spicy chicken, mayonaise and rocket or salad
Ham (from Pipperfield Pork at the Farmer's Market), mustard, tomato and salad
Ham, cheese and coleslaw
Substitute sunblush or sundried tomatoes in winter, but use only the freshest tomatoes in summer! Go on, make some bread, have a nice fresh sandwich with no paper or plastic cartons, no waste, nothing artificial, just pure goodness…
Vegetables > Steam-fried Cabbage 8 June 2006
Posted by cath in Recipes, stir-fry, variations, vegetables.2 comments

Cabbage steam-fried with herbs and balsamic vinegar
I often find it difficult to find interesting recipes for vegetables. Cabbage is always a hard one. It’s often best simply steamed or wilted, but some more substantial cabbage varieties, particularly red cabbage and dark green cabbages, are really good stir-fried with steam, what I call: steam-fried. Steam frying can be done simply by shredding cabbage, followed by a quick stir-fry in a tablespoon of oil, then the addition of up to a glass of water, usually in one or two splashes.
This method is quick and easy, depending only on how much cooking the cabbage needs. Once you’ve added the water to the hot stir-fry, put the lid on for 5-10 minutes with the heat turned down to medium. The steam wilts the cabbage, the oil or butter gives it a glaze. Test a bit to see if it’s done. If not, add some extra water as required and put the lid back on for a few minutes more.
To make cabbage a bit more interesting, you can add herbs to the steam-fry. In this recipe I’ve used thyme, lemon thyme and chives along with a wee sliver of garlic in the oil. I’ve also finished the glaze with a splash of balsamic vinegar, which gives a slightly sweet edge and I think works nicely with cabbage. I also slipped in some nutty walnut oil – just a splash as I like that flavour in cabbage too.
Ingredients
1 cabbage
freshly cut herbs, i.e. thyme, rosemary
1 clove garlic
1 tbsp balsamic vinegar
1 glass cold water
1 tablespoon olive oil
small lump of butter
(optional, some walnut oil)
Some chives (chopped) and lemon thyme (removed from stalk) to sprinkle on top
Salt and pepper
Preparation
- Shred the cabbage into strips, not too fine, removing any tough stalks (you can also cook the stalks in the same way – I love eating them, but others are not so keen!)
- Heat the oil and butter in a wok or large-based pan (make sure you have a lid)
- Add sliced garlic to the hot oil and quickly swish round the pan. Add any thicker herbs (rosemary, thyme) to flavour the oil a bit.
- Now add the shredded cabbage and stir-fry for 2 minutes, coating the cabbage with oil. Season with a little sea salt.
- Now add some water, making sure it starts to bubble. Half a glass is usually sufficient at this point. Put the lid on, lower the heat slightly, and cook for 5-10 minutes, shaking occasionally. The longer you cook the cabbage, the more likely you will need to add some extra water. Take the lid off and check inside for steam, add water and stir again if necessary, then replace the lid.
- Once the cabbage has wilted, remove the lid, make sure that you dry the cabbage by steaming off any excess liquid in the pan. To give the cabbage it’s final glaze, add the balsamic vinegar and stir through.
- Turn off the heat.
- Sprinkle the top with the extra herbs, some freshly milled black pepper and stir to combine.
A great accompaniment to many meals, Vegetarian-friendly. Try it with cauliflower and macaroni cheese…recipe coming soon…
Variations
Walnuts added to cabbage make a great combination, similarly with brussel sprouts.
You can add any herbs you like to this dish. Meaty cabbage: Try steam-frying the shredded cabbage by first rendering the fat from some bacon or pancetta. Remove the fried bacon and any excess oil. Add the cabbage to the bacon fat in the pan, stir-fry and then add the liquid and steam for 5-10 minutes (less for sliced brussel sprouts) and then take the lid off and steam off the excess liquid. Now stir-fry some chopped walnuts into the cabbage and add the chopped crispy bacon back to the dish. I love making this with brussel sprouts and people certainly seem to enjoy it.
